A few weeks ago I wrote about how I tested my MVP with Google Ads in order to try and kill my dream of launching a profitable product—a printable place card maker—as fast as possible. The basic premise of that test was: can I get people to give me their email address to use my product?
Fortunately, the test was a success—I was able to collect an email address from about 20% of the people that I sent to my site via Google ads. This answered the question of whether using the site was worth giving up an email address. But was it worth actual dollars?
That was the question I had to answer next.
Like last time, I approached this question from the philosophy of trying to do as little work as possible to kill the dream as quickly as possible. This post describes that process, and what I’ve been able to learn from the results so far.
Early Pessimism
I’ll admit, I came into this test feeling pretty pessimistic. Here’s why.
In my last test there was one more experiment that I didn’t show. In addition to seeing if I could get emails, I also wanted to start collecting information on “willingness to pay”.
I did this by running two slightly different Google ads and comparing their effectiveness. The ads were practically identical except for one small thing—one of them used the word “free” and the other used the word “beautiful”.
Look at the click numbers between the two versions:
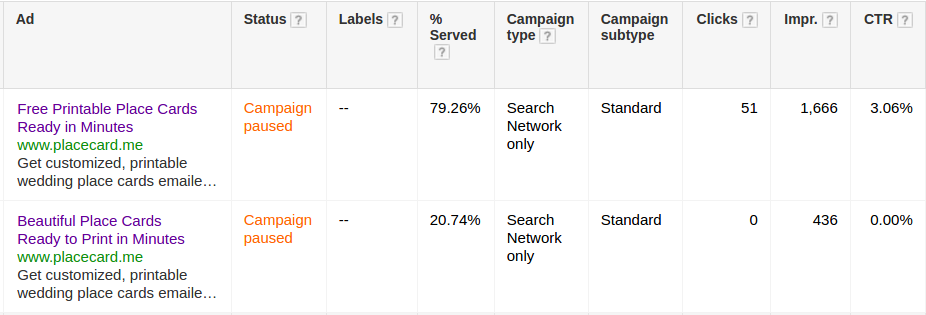
Fun fact: 51-0 is also the score of the worst loss in Pittsburgh Steelers history
Yep that’s right—100% of the 51 clicks came from the “free” version of the ad.
Google did figure out that the “free” ad was doing better and started showing it more often (about 80% of the time by the end of the test) but this is still pretty telling data. In the sports world, I believe this would be called a “shellacking”.
So, it was with a pessimistic attitude that I sat down to figure out how to test pricing.
Choosing a Pricing Model
The first thing I had to do was figure out exactly what I was going to charge for. In my case I had three main criteria I wanted to achieve with my pricing:
- It should offer a free tier
- It should provide value for money
- It should be easy to implement
I wanted a free tier because of the ad numbers above—they showed me that a free tier would likely be the best driver of traffic.
Providing value for money is kind of obvious and something every product should strive for. If you’re not providing value what are you doing?
Lastly, I wanted it to be easy to match my MVP mindset of “do as little work as possible to test things.” I could spend a lot of time designing and building the best possible pricing, but I’d rather spend 10% of that time on good enough pricing. This was especially true given the pessimism I had about this test being successful.
Gary Vee understands giving value
Based on the criteria above I decided on something very simple for my “good enough” pricing.
I would charge for certain designs on the site and keep a few free.
I knew from prior market research that plenty of people were paying for custom place card designs on sites like Etsy, so there was willingness to pay for “better” designs. I also decided that keeping it limited to the designs would be much easier than other more complex options I considered, for example, charging for customization. In the MVP stage, simpler is almost always better.
So, I created six more templates on top of the three I previously had, made my three least-favorite templates free, and assigned prices between $5 and $15 to the remaining six (based on similar price ranges I found on Etsy). Done.

Final set of templates and prices
MVP-ing the Test
I originally set out to actually build in an entire payment workflow into the product and collect money from people. However, pursuing that path took me down several rabbit holes of yak shaving, and ultimately I decided to go with something far simpler:
I decided to completely fake it.
So when you went to the place card maker page you would see a bunch of paid templates—and it certainly looks like you’ll have to pay for them—but at the very end of the funnel you’d see the following message:

That second line was literally the only difference between the paid cards and the free ones.
Once I made this decision, the whole thing took me about 10 minutes to code up. Much simpler than figuring out how to setup Stripe and building out a whole payment flow.
Thus, instead of testing the ability to collect money I would instead test whether anyone would sign up to make cards using a paid template—presumably with the intention of spending money. It’s not perfect, but it is easy, and I do love easy.
Running the Test
Ok, onto the fun stuff—the actual test.
Like last time, I used Google Ads to send traffic to the site. I chose a budget of $4 a day and decided to let it run for a week. I somehow ended up spending $31.41 in total—a bit more than I anticipated but still a good deal.
The key to thinking about this ad-spending is to look at it as a test and not as a revenue model. My plan was to see if the thing works with the ads, then figure out how to get traffic without ads only if it looked promising.
That said, having run this test, I’ve now realized that the later in the funnel a test runs, the more expensive it is. If I want a sample size of 50 people to test my ability to collect email addresses then I only need to generate 50 clicks, but if I want to collect 50 data points on willingness to pay I need five times that number (since only one in five clicks gives me data). At $.50 per click those numbers add up!
Anyways, on to the results.
Reinforcing the results of the first test
The first thing that was useful about running another test was that I was able to reinforce some of the lessons from the first test. Specifically, my conversion rate to email address stayed strong at 20% and my ad-to-conversion cost was also consistent around $2.50. It’s good to know that those numbers weren’t total flukes.


Clicks (blue, left axis) and conversions (orange, right axis) per day, and overall stats on the ad performance for the week.
The other thing that wasn’t a fluke was the preference for “free”. I tried a few more ad variants but the results still came back overwhelmingly in favor of anything that featured the word “free” anywhere in the ad:
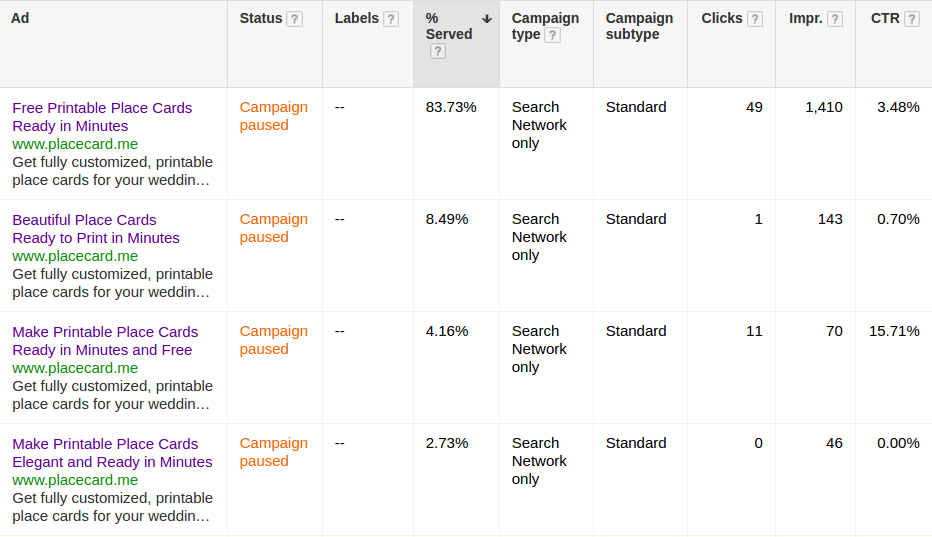
If my ads were one-minute commercials, less than one minute an hour would be spent on the non-free versions
The Real Results
Great, so we already knew that people were willing to give up their emails and that they like free stuff in ads. What about dollars? Did anyone actually choose a paid template?
Surprisingly and amazingly, yes.
Two people, of the 12 that converted, in fact. Both chose $5 templates.
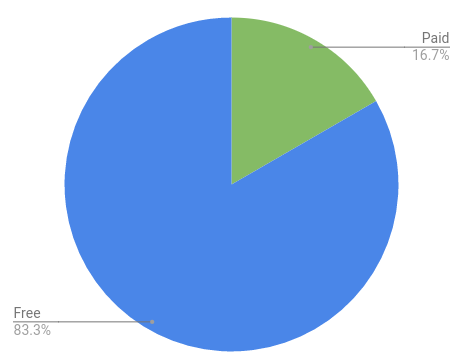
This chart is not even close to statistically significant
The Dark Side of MVP Pricing
When I first got the email that someone had chosen a paid template I literally fist-pumped and started dancing at my standing desk. People were ready to give me money!


I’d rather not admit how much time I spent looking at celebration gifs before landing on these three
Now I’m left facing the downside of my approach. Specifically, that didn’t actually run a real “willingness to pay” test—I ran a “willingness to consider paying” test.
I guess I’ll have to figure out that payment stuff after all.